Learn from Australian experts in online engagement on how to deliver Virtual Excursions. Find out how to set up your space and use the right technology for your programs. Create professional, successful, engaging session for your audience.
Worried about being on video?
More people than ever before are doing live videos and things don’t always work out perfectly. No one expects perfection. Being relatable and real is more likely to help endear your audience to you. Practice makes perfect – try it out on your friends, family or colleagues and be open to feedback.
Find out about the importance of audio, video and lighting with Stephen Bancroft from RVR Media.
Where to start?
Choose a web software platform that works for your audience. Think about your own capacity to manage and host people online, and how you want to manage your audience interaction.
Check that your chosen application or software connects with your A/V technology and won’t be blocked by internet security or firewalls.
Use easy timezone conversion tools, consider when people will most likely participate and put date and time information together for example: Monday 5 June, 16:00 AEDT.
Cameras: Will you have more than one? Ensure your video system connects with a good audio system. At least have a good quality USB camera with a built-in decent microphone and consider a light. Consider a versatile videoconferencing camera with pan tilt and zoom. A lot of the great camera work is about good set up – making sure the camera can focus, and setting your room up with interesting props that you can use as an alternative to ‘talking heads’.
Audio: If you’re doing a webinar, the audio may be good enough on a new laptop. Next level up: a headset microphone or a good Bluetooth microphone. Reduce echo where possible, for example with soft furnishings.
Check your network and internet: Make sure your internet is fast and reliable. An ethernet cable connected to a computer is always better than WiFi. Reduce the amount of internet being used during the conference by turning off Netflix, YouTube or other similar high-bandwidth heavy applications during your session.
Type ‘speed test’ into Google to run an internet speed test that will identify any site issues. If you have a video conferencing system, their diagnostics will allow you to look deeper into the speed of the data and as well as data loss.
Do technical checks on everything days before. If you’re using video conferencing, use a Videoconferencing Test Site service. On the day, log on early to test everything. Have a backup if everything fails for example an email or social media post drafted ready to send. Ensure speakers are aware of the backup plan.
Discover what you can do to create a great space for delivering virtual excursion with Karen Player from Australian Environmental Education
Online delivery essentials
Use this as your checklist to help deliver engaging Virtual Excursions.
Have a clear strategy: Know who you are talking to, what they might enjoy (you can always test and adapt), and what you are trying to achieve.
Develop an effective content and delivery plan: What are you going to present? How will you make and keep it interesting, at the right comprehension level?
Check your visuals: Everything from the speaker and their background to what you want to show your audience.
Check your audio: ensure you have good quality voice amplification, any external audio set up, and avoid annoying background noise.
Record your event: Even if you don’t share publicly, by reviewing your work you’ll get better. And if you do share it out you’ll have bonus data on your audience.
Make sure you have a plan, you have tested your equipment and done a practice session and remember it is OK to make a mistake.
This content originates from Web Conferencing 101 Essentials training. The Virtual Excursions training package was coordinated for national delivery by Inspiring Australia NSW. It was produced and delivered by Fizzics Education, Sydney Science Education and Refraction Media with support from the NSW Office of the Chief Scientist & Engineer and state Inspiring Australia programs in NSW, ACT, QLD, WA and SA.
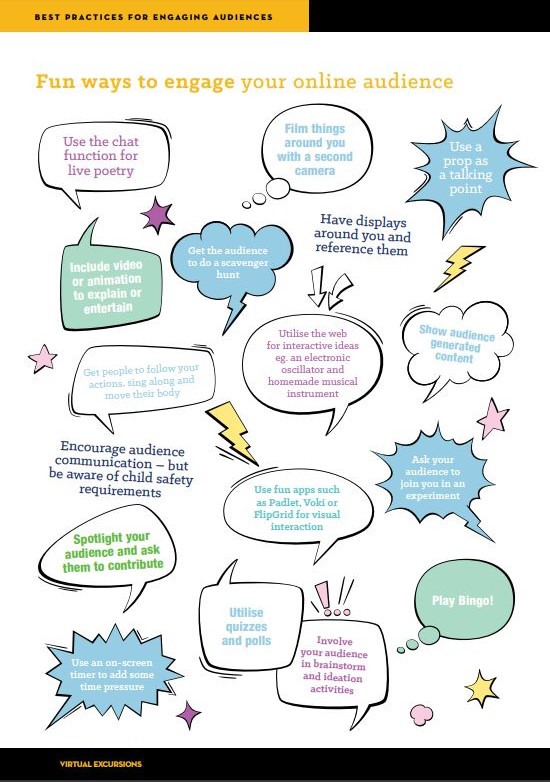
Discover some great ideas to engage your audience online. Remember engaging event involves more than watching a talking head. Plan ahead, know your audience and what you are trying to achieve. Use your passion and content knowledge to get the best out of your programs. Make the most of your resources and props and don’t forget to use these fun engagement ideas.
Fun ways to engage audiences online Heather Catchpole from Refaction Media
The Virtual Excursions training package has been coordinated for national delivery by Inspiring Australia NSW. It was produced and delivered by Fizzics Education, Sydney Science Education and Refraction Media with support from the NSW Office of the Chief Scientist & Engineer and state Inspiring Australia programs in NSW, ACT, QLD, WA and SA.
There has been a big push in recent week for educators to get ready to deliver online learning at home. Classroom teachers preparing to work from home, excursion providers wanting to continue to support their school base and incursion providers that can no longer visit on site. All these groups are trying to find a space, rearranging furniture and wondering how they will make this work. Like me often with their own kids at home as well.
Ben Newsome from Fizzics Education is often asked how to avoid mistakes in setting up distance learning spaces. Ben has extensive experience delivering virtual excursion and is well placed to help us prepare for online learning. Every learning space is different especially when we are all looking at delivering programs from home.
No matter what you do it is better than doing nothing! Unfortunately, there are lots of distance educators that I know of that could help kids with live online classes, but due to the rush to self-isolate, not all of them were not able to get their equipment out of their distance learning studios in time.
Assuming that you’ve been given the green light to put together a distance learning space at your home, starting with what not to do is a great way to frame your thinking around what to purchase and what to avoid.
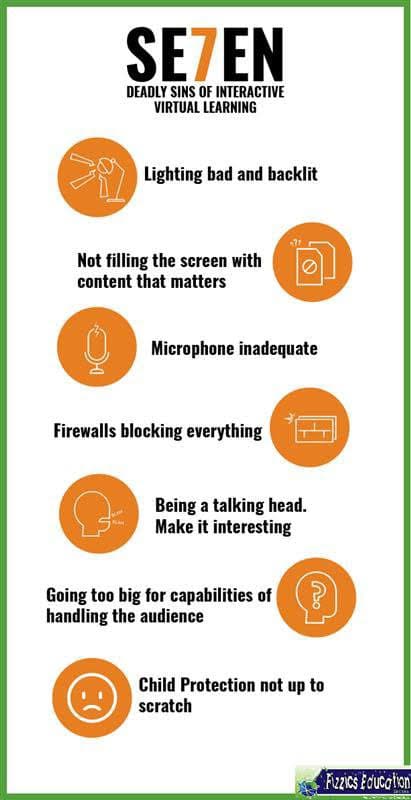
Let’s look at these 7 virtual learning problems
Number 1: Lighting is bad and backlit
Lighting means the kids can see what you’re showing them! It’s so easy to overlook, yet having multiple light sources both in front and behind you gives students a solid chance to catch the little details. Some tips for lighting:- Reduce shadows where you can by pointing multiple lights around you or the thing that you’re showing.– Avoid having a window behind you or otherwise, you’ll look like a silhouette– Lighting in the background matters too– Soft, cool hues in your lighting tend to show up most scenes better– Don’t blast the subject matter with strong light… it’ll look like a white blur to the remote audienceDepending on your budget and space in your house, you can make an awesome space with not much effort.
Number 2: Not filling the screen with content that matters
This is an odd one to write but correct framing of the subject matter is often missed. If you are showing something on a desk, for example a beaker, the only thing that the remote audience should see is… a beaker! All the other surrounding things are just a distraction and no-one wants to see your background when they are trying to see the subject matter that you’re talking about.
Number 3: Microphone inadequate and not muting when required
Microphones are finicky things. It seems like you need to keep buying more and more expensive microphones just to keep up with the Joneses. The good news, you don’t really need to spend too much. Given that this is about planning for your home studio, you just need a good quality USB camera with a built-in decent microphone. Of course, you could improve that setup by adding a headset microphone so that the volume is constant no matter which way your head turns too. Be aware that sound bounces in your house, soft furnishing reduces the echo that can come back at the microphone. I snuck in an extra ‘sin’ to address here… microphone etiquette.
Muting your microphone is essential to have a decent conversation with more than 1 person. Imagine sitting on a bus with 30 students and they’re all talking at you; no-one enjoys that! Teach students to mute unless directly asking or answering a question. It’s also great practice to learn to wait our turn!
Number 4: Firewalls blocking everything
The technology coordinators and network administrators won’t like me saying this, but firewalls really make good times go bad for video conferencing. Of course, a computer network needs to be protected and this is especially the case when dealing with a district or even State-wide rollout of devices. Naturally, you’d be protective. However, I’ve encountered times when I’ve tried to connect to a school but the firewall won’t let me through and no-one will let my IP address get through despite a class waiting for their virtual lesson the next day. I’ve also encountered times when a school really wants to connect with me, however the district has determined that only a particular product can be used and will not let anything else in… despite that product being inadequate for the lesson needed and that product filled with security flaws in the first place.What has the above go to do with your home distance learning room? Your home is going to have a different IP address outside of your organisation and as such, you’ll need to do some testing with someone who handles IT. They’ll need to let you into the network or all your work will be for naught whilst they sort out their security problems.
Number 5: Being a talking head. Make it interesting
Blah, blah, blah… don’t you just love listening to that sort of presentation? Monotone, methodical and frankly boring cadence will send your audience to sleep. No-one likes this! Don’t be that person. Make your presentation fresh and interesting with lots of things to show and lots of things for your audience to do. They’ll thank you for it.
Number 6: Going too big for your capabilities of handling the audience
We can all get excited about the possibilities of reaching people all over the world. I also personally know of some ways that you can reach a lot of people and still preserve interactivity. But my question to you is… are you ready for that yet? Even if you know the software tools backwards, do you have extra people available to help you? What is your backup plan? What about your administration team? Unless you’ve thought out how to handle large audiences, well, keep your classes small for your own sake and that of the distant learners.
Number 7: Child protection missing, disjointed or misleading
This is the worrying one. During the COVID-19 outbreak, I’ve seen everything in the media from Zoombombing to partial exposures to toilet gaffs and more. This is just a natural consequence of people trying to move too fast with a technology they have not yet mastered, combined with the darker elements on the internet taking advantage of people’s naivety. It is essential that you understand all of the child protection and privacy protections that your software gives you. If it allows your audience to show their face, hear their voice, type something in… then you are responsible for making sure that nothing gets shared that is inappropriate, illegal or immoral.
The only way out of this is to lock down your meeting rooms! Control who gets to be seen, heard or typed right from the very start and make sure that the virtual meeting room is password protected. It is critical that you get child protection right. This goes hand-in-hand with knowing your capabilities with the software and how to look after kids from the moment you engage with them. If you don’t know what to do about child protection during online virtual classes, the time to ask is way before you ever go live.
It is not just a case of blaming the software, the user must take responsibility too.
Given all the things raised in this article, you might be wondering where to next? We have been running technology accelerators for years now and have created a series of modules that you might find useful for setting up a distance learning room. What defines these modules is less theory and more practical… i.e what do you actually need to know? If you’d like to know more, just drop us a line and we can have a chat about what might be appropriate for your needs.
Running distance learning can be highly rewarding, just make sure you’ve got the right tech & know how in the first place.
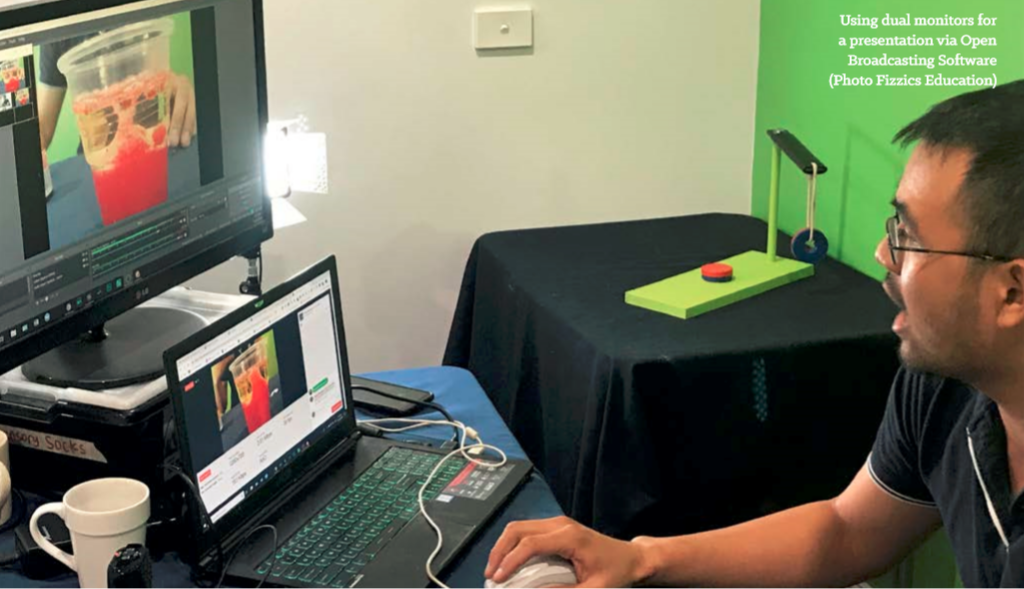
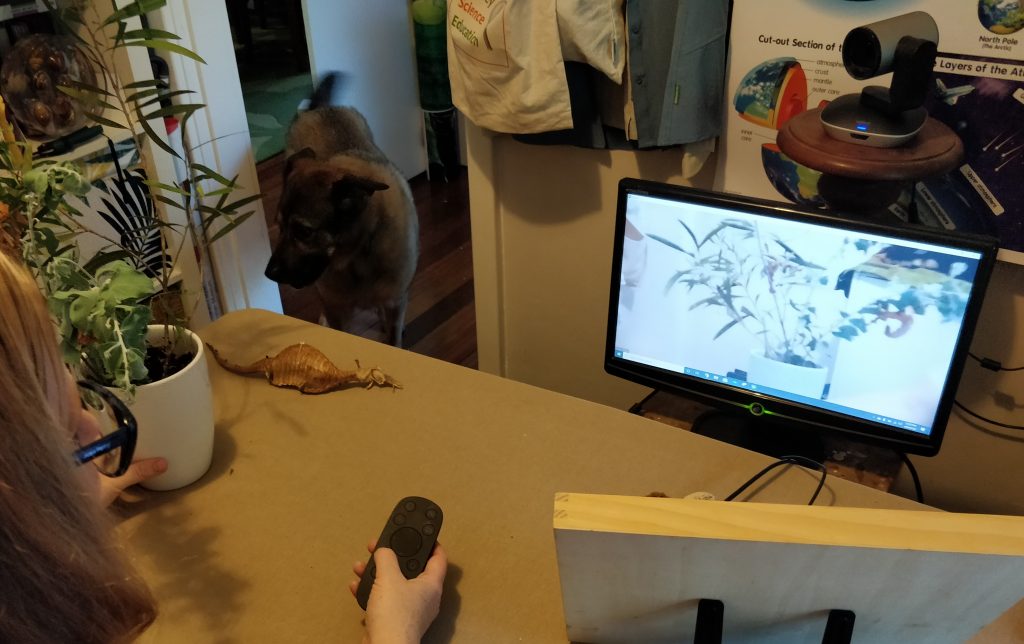
I would like to add a few comments from my experience, especially over recent weeks delivering Virtual Excursions from home. Always be prepared for the unexpected!
I left the door open a crack and my dog came into a session mid way, not a disaster but very distracting as his tail was in front of the camera. I prepare my kids when I am about to go online, I let them know how long I will be. I also give them an activity and a snack to keep them busy.
Have a technology back up. Our Wi-Fi went down mid session and I had to scramble to switch cables around to reconnect. I was lucky that I has an easy solution and was offline for less than 5 mins.
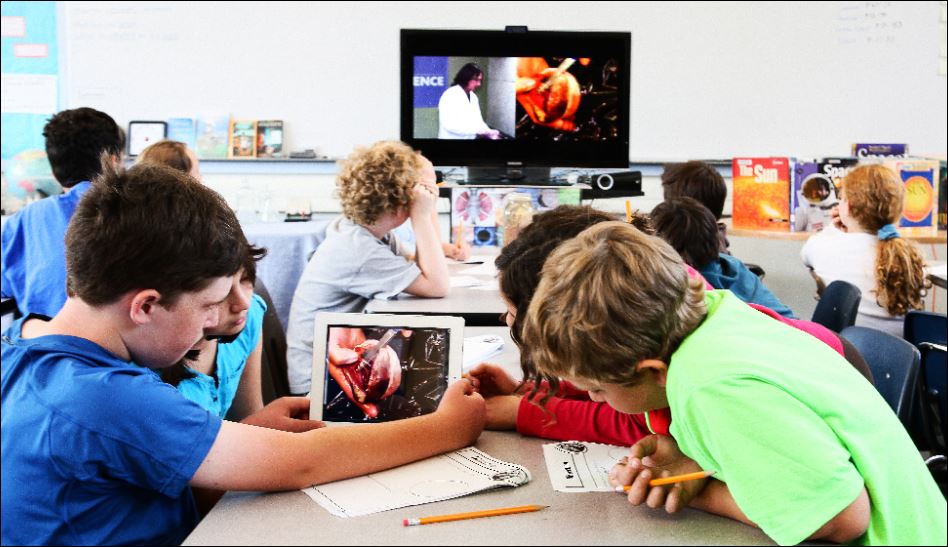
Video conferencing brings education opportunities into your classroom and creates unique learning experiences for students of all ages. There are a variety of ways to use digital technologies to discover new learning opportunities. I think the best way is to participate in live, interactive video conference sessions. This enables your students to ask questions and really be involved in their online education, interact not simply watch a video.
Connects Different Schools for Collaboration
Collaboration becomes easier across schools and teachers networks with video conferencing. Teachers can connect through for teaching training, have a webinar for online education with other schools. Teachers can see and hear other attendees, have discussions and share useful information like whiteboard, screen and more with each other, like you were in the same room.
Enables access to Learning
Studying in classrooms is always taken for granted for most of your students. However, some of your students, especially those who live in remote and rural area don’t have the same opportunities. Students that are home schooled can have access to the same resources as others do in the classroom. when your schools are far away from their homes. In this case, it’s a good idea to adopt video conferencing for virtual classrooms. With its help, your students don’t need to go for a long distance to attend school. They can learn new knowledge and even experience a virtual school trip without going outside.
Video Conferencing Enables to Record Lessons for Review
Sometimes, your students might miss the class due
to a sick leave. In order not to fall in the learning process, they want to
review the lesson. However, learning a lesson by students themselves is not so
easy, especially when the lesson contains a lot of new knowledge. In this case,
video conferencing turns out to be a good helper. As you know, one of the
important benefits of using video conferencing is that it supports recording
and playback. When your teachers are teaching lessons through video
conferencing, they can record it. Then, your students can review the lessons with
the recording after classes, just like they have classes usually.
Empowers to Chat with Expert Face to Face
One of benefits of video conferencing in schools is
that it brings an easy way for your schools to invite experts to impart teaching
experience to teachers and give classes for students. All things that your
schools need to do is to invite expert to join an online video conference.
Teachers and students can chat and interact with the experts. On the other
hand, experts always have a busy schedules, and this kind of conference helps
them to save a lot of time and money for travel.
Makes Out-of-Class Learning Easier
Education does not end when formal classes ends. It
is a lifelong process. When your students and teachers finish classes, they
might plan to do out-of class learning to enrich themselves. However, subject
to the restriction of time and place, Out-of-class learning turns out to be not
so easy as you imaged before.
If you want to provide a platform where
your teachers and students can have out-of-Class learning, you can take video
conferencing into consideration. One of advantages of video
conferencing for education is that it makes out-of-class learning much easier.
Your teachers can use the video conferencing to teach students. Students and
teachers can also create study groups to learn from each other from their
homes.
Helps Connect Teachers to Parents Closely
Your teachers always hope to keep close in touch
with every student’s parents all the time, especially when holding a
parent-teacher conference. Sometimes it’s a little bit difficult for every
student’s parents to attend the parent-teacher conference when they have a busy
work arrangement or when they’re on a business trip.
Video conferencing helps minimize the conflicts
between your teachers and students’ parents. Teachers don’t have to invite
every student’s parents to go to the school for the parent-teacher conference
when they really have their hands full. They can invite student’s parents to
attend the parent-teacher conference via a video conferencing solution, no
matter where students’ parents live or stay.
Lets Students Experience A Virtual School Trip
Image that your school plans an exhibition visit in
order to let your students better understand the history and culture. To make
it, teachers have to make full preparations ahead of time, including the
destination to go, the bus to take, the food to eat, the time to go and back,
and so on.
However, things don’t always happen as it was
planned. Time restraints, budget issues and bad weather, any of which might
make a trip impractical. With regard to this, why not bring the school trip to
classes? It’s completely feasible with the help of video conferencing solution
for education. By using it, students can enjoy the school trip when sitting in
the comfortable classroom.
Video Conferencing Reduces the Cost for Education
The last benefit of video conferencing in education
is that it reduces the cost for basic facilities for education. As you know,
some schools, especially in remote rural area, have not enough funds to build
or expand the teaching buildings because of a variety of reasons. In this
circumstance, using the video conferencing solution for education is a good
choice. It not only reduces the cost, but bring a new world where your students
can see, hear, learn something they may not know when in a common class.
The parts mentioned above mainly tell you the
benefits of video conferencing to students, to teachers, to schools and to
education. Look it in another way , it also suggests the great importance of
video conferencing in education. Thus, there’s no doubt that more and more
video conferencing solutions appear, like ezTalks Meetings. With the
development of video conferencing, video conferencing will play a more and more
important role in education in the near feature.
There are so many ways you can use video conferencing to discover new educational opportunities, from visiting world-class museums and zoos to diving on the coral reef! Still, often as a teacher you get your training on how to use the newly installed VC system and then you’re left to your own devices to work out the intricacies on how to use it. If your school timetable means that you don’t get to use your system for a couple of months you can quickly forget some of things you need to know to make your experience much more enjoyable (for both your students and for the far end site working with you).
To help, here’s a few tips that can help out when preparing for a virtual excursion, plus some simple hacks to make you look like a pro.
Setting up your room
Connect a computer to your system with a HDMI or AV connector. You’ll then be able to share all sorts of content with the remote students. If you want you can use an adapter to connect to your iPad so that you have a document camera with extra functionality.
Have a remote mouse and keyboard at the table near you. That way you can access photos and applications easily. It’s useful to have a Google page open so that you can look things up on the fly as needed. Additionally it can be helpful to have the batteries easily accessible so that if you run out of charge you can quickly change them over.
Consider your placement of your audio. Try to get the microphones as close to the middle of classroom as possible. Sometimes this is not feasible so in that case you can have someone next to the microphone to relay questions and answers coming from the back of the classroom. VC systems come with a variety of noise cancelling microphones. If you choosing to run a web conference via your computer instead of a H.323 VC system it’s worth purchasing a USB noise cancelling microphone as the sound quality for the remote sites is far superior than what you usually get with your inbuilt microphone on your computer.
Put a white board right next to your TV or projector screen and list down the different schools who are attending (especially if you’re leading the conference). That way you can quickly glance to the list and know who you’re speaking with. It can really help if you have a magnetic button to that a volunteer can quickly slide along so you know who spoke to last!
Before the conference
Set your camera presets before joining the conference. This means a view of your entire classroom, a view of your experiment table and perhaps 3 separate views of the left, middle and right-side of the classroom. It can also help to have a whiteboard view as well so you can quickly write down things to show the other schools. How do you do this? Generally if you zoom your camera to view you need you can hold down a number button on your VC remote and a preset will become stored for later use. Check your usual manual on how to switch between views (Polycom is slightly different to Cisco for instance).
Learn how to toggle the various layout views from self view and ‘Brady bunch’ view. I personally like the self-view option as I can see exactly what the other schools are seeing and I simply toggle back to active speaker view so I can see the other schools when they speak back to me. It certainly helps me see what’s going on!
If there are windows in the room, close any drapes or blinds. Daylight is a variable light source and can conflict with interior room lighting. Try to avoid ‘back-lighting’ as you will come across as shadowy figures with your faces hidden.
When adjusting your camera, try to fill the screen as much as possible with people rather than with the table, chairs, walls, lights, or the floor. People want to talk with people
For microphones not fixed to the ceiling or table, ensure they are at least 1 meter away from the video conference camera/endpoint and not near any other electronic equipment otherwise audio will be severely affected (think audio screech).
Have the experiment materials and volunteers ready in your room so that the conference can be more interactive. Your student’s experience in video conferences is affected greatly by what they get to do. Imagine if you were a student and have to sit by and watch another school do fun science experiments in their room without you getting to have a go, all because your teacher’s plan is to run the experiments later. You wouldn’t have much fun and certainly would report to the teacher that you don’t like distance learning as much. Give your students the best chance to get the most out of the conference.
Prime your students so that they’re ready to ask and receive questions during the conference. Some teachers get kids to research the content quite deeply and have a question written down so they don;t forget, just make sure that they don’t spend the time worrying about their time to speak and rather engage in the general conversation that occurs in the virtual excursion.
During the conference
Keep microphones muted until invited to speak by the presenter. Mute your microphone directly after speaking. There is always peripheral noise at schools and the microphones pick up everything. This is a big distraction to the presenter and other participating schools.
Use your presets you setup earlier to show the other schools your students, your experiments and your classroom itself. It’s great to have a view setup for outside your window too – kids love to see outside as a peek into your world.
Due to the nature of some school’s allocated broadband speed there is a chance of reduced clarity in picture. If a ‘dropout’ occurs simply redial into the conference.
After the conference
Like any lesson, this is the time to consolidate learning by asking questions with your students about the content presented and to run aligned follow-on lessons. The more you align a video conference with your standard learning sequence the more valuable it becomes.
As with all things, the more you use it the more familiar you are with what you can do and therefore the better your experience in virtual excursions. Learning to run one of these systems can be fun if you contact a colleague in another school to try some test runs with you. Even better, get some of your own students to learn the controls which means that you won’t have to always rely on having to set it up yourself plus the students will get extra technology learning outcomes and confidence with using modern communications.
If you need any help at all please feel free to drop me a line or you could have a in-depth read of my Churchill Fellowship report which details best practice in science education via video conference.
In the last Virtual Excursion Australia meeting we were discussing what type of system or technology should I use to deliver virtual excursions? The answers were varied and depend on what was being delivered, talking head presentation or multiple camera production. Where the audience was also a consideration as it determined what technology the content was able to be received on.
We have 3 different Virtual Excursion Australia content providers sharing their ideas.
Ben Newsome from Fizzics Education uses H.323 Polycom or Tandberg codex for video conferencing either direct IP to IP call or through a bridge like DART Connections, Electroboard or CILC. A H.323 for video conferencing codex is required at the other end to receive this content.
An alternative used by Fizzics Education is connecting by Polycom Realpresence or Zoom for web conferencing. Web conferencing is a software based option that is contained entirely in a web browser making is cheaper and easier to access for casual use.
Fizzics Education also uses an iPad connected via an A/V cord as a document camera.
Anne Doran from the Australian National Maritime Museum uses a H.323 for video conferencing codex for their interactive sessions. Youtube live streaming has been used for big events. Live streaming extends the life and reach of the presentations as they were hosted on the Department of Education You tube channel for a period of time after. A twitter back channel and email was available for questions.
The Australian National Maritime Museum will continue to use YouTube live for offering selected programs as a resource to high school students and teachers as it is a difficult audience to schedule programs with. YouTube offers flexibility for teachers to view the program either live with the twitter/social media back channels or at a time suitable for them.
Karen Player from the Australian Museum also uses a H.323 video conferencing codex for their interactive sessions. This allows them to set up different camera angles and to send PowerPoint presentations to the far end. The Australian Museum has recently run a successful session with Sydney Distance Education through Zoom and they will be exploring more web base technologies in the future to provide schools with more flexibility
The Virtual Excursion Australia conference in 2015 was a great example of how to integrate these technologies. We were able to have the Australian Museum in Sydney and AMCI in Melbourne connect using H.323 video conferencing codex’s though the AARNET bridge and live stream the combined output using a link embedded on the Virtual Excursion Australia website.
Put simply a Tricaster is a TV studio in a computer designed and built by Newtek. If used properly it has the power to transform your basic video conferencing event into an all singing and all dancing, high quality broadcast event.. Combining a Tricaster into what would otherwise be a standard v/c event enables you incorporate things like, seamless switching between presentation images, video and third party video feeds. Use the Tricaster with a professional audio mixing desk, high quality cameras and microphones and the viewer at the other end would be hard pressed to tell the difference between what you are producing and what they see on TV.
Most cultural institutions would need either the Tricaster 460 or the Tricaster Mini. These would allow you to mix up to 4 digital/analogue camera sources, 2 laptops, and mix video or audio directly from the Tricaster. The Tricaster will allow you to mix, record & stream your v/c events via the web or via traditions H.323 equipment.
But why hear if from me ? Take a listen to the people that use it for real.
—
Stephen Bancroft is an an Electrical Engineer and Computing expert, he has over twenty years experience with internet based technologies and has worked extensively with live sound and broadcast. He is currently writing technical articles exclusively for VEA.
Recently there has been a bit of excitement in our community regarding using Zoom Video Conferencing as a gateway to reach potential audience that may not have invested in a full suite of Standard Based (H.323) v/c kit. Think of Zoom as Skype on steroids! You can set up a meeting, invite guests, and have them connect simply through their browser. There is no complicated software to install and everything works through the browser without having to install additional software, which is great for companies which have restrictions on such things.
On of the most exciting things for us is that Zoom is free, so anybody you invite to a meeting can use it. And the fact that they provide what they call a H.323 Room Connector. This optional extra can be purchased for a small price of $US49/mo and enables H.323 video conferencing units to join the meeting. Which finally means that we can connect all our v/c units and users together in one big conference!
This all sounds fantastic but there are a few caveats that you should be aware of. Firstly you need to know that DART has (for the moment) put a ban on using Zoom to dial directly into their system. The main reason for this is that the connection that Zoom creates is forced to a connection speed of 6 megabits per second. This is far to fast for DARTs front end points and causes congestion and high usage, resulting in poor experience for other users on the network. To work around this you will need to dial directly into Zoom using your H.323 device so as a result means that it is unusable with DET schools as you need to use DART to connect to them. However as you will read I have been able to work around this using two H.323 devices.
Secondly, unless your guest using the H.323 room connector and a standards based v/c unit, then they will be using their computer which mean they will also be using the webcam and microphone which is included. Generally these built in devices are fairly cheap and are designed to work with just a single person not an entire room of people, so depending on your application the results not be acceptable.
If you really want to take full advantage of what Zoom has to offer you can configure a set up in which you use two H.323 units and a video switcher such as a Tricaster. To do this you would dial the first H.323 unit into DART as you normally would and the second unit would dial into Zoom. In this scenario any schools you need to engage would be connected at the DART end and any ‘special guests’ could be connected to Zoom. Exactly who sees what is controlled by the vision switcher. However, doing this requires quit a bit of technical know how! I have personally done this with a video conference at The Powerhouse Museum and the results where similar to that of a TV broadcast. You can see for yourself HERE.
Is Zoom worth the investment ? Probably….. for $US49/mo I think it’s worth at least trying out, you may find that you have no use for it or your organisation does not have the technical ability for it, but you would not have lost much in doing so. But you may also find that your audience reach has been massively extended and the return will be far greater than the small investment.
—
Stephen Bancroft is an an Electrical Engineer and Computing expert, he has over twenty years experience with internet based technologies and has worked extensively with live sound and broadcast. He is currently writing technical articles exclusively for VEA.
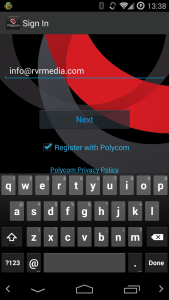
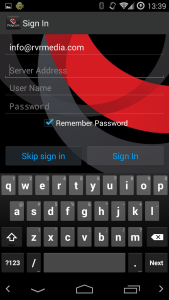
Ever wanted to join in a video conference (H.323) from a your phone or tablet? Well it is possible. Start by installing the Polycom RealPresence application for Android or iPhone. Start the application and you should be greeted with a screen similar to this. I am using Android 4.4.4 so your screen may look a little different.
At this point just enter your email address and click next. Now you will get the following screen.
At this point you would be forgiven for thinking that you need to sign into some sort of Polycom server or infrastructure, but you don’t need to, just click ‘Skip Sign In’ and you will get this screen.
Now your in business, you can enter a H.323 IP and dial directly. Test it out your self by dialling one of the VTCTEST numbers.
Enjoy !
—
Stephen Bancroft is an an Electrical Engineer and Computing expert, he has over twenty years experience with internet based technologies and has worked extensively with live sound and broadcast. He is currently writing technical articles exclusively for VEA.
There has been much talk around the video conferencing robot at the National Museum of Australia. Developed in collaboration with the CSIRO and the Department of Broadband, Communications and the Digital Economy, the telepresence robot roving the NMA’s floors has allowed multiple remote schools and libraries to simultaneously connect to an onsite educator to ask questions as well as explore the exhibits themselves using the panoramic cameras that create a 360 degree view with zooming capability. The only issue is that whilst the technology is very exciting the associated price tag makes it difficult for other sites to attain easily.
Double Robotics iPad robot seen in Atlanta at ISTE 2104
There are low cost options that have been roaming educational halls and hospitals for years and represent an exciting way to scale the concept for Australian needs. During my Churchill Fellowship tour I came across a couple of these solutions and was very impressed with how easy they are to operate and the attainable price for implementation. The New York Hall of Science uses a VGO robot as a way for remote learners to interact with summer science camps occurring within the galleries. The learner is able to log onto the robot and control its movement, effectively acting as an autonomous student. There are other models available too; a popular one in schools is the one from Double Robotics that is effectively an iPad rolling on a small version of a Segway. In both cases these VC robots have found uses in hospital systems for bed ridden patients to provide virtual mobility as well as in schools for remote students to participate in lessons. The remote site simply downloads an app and controls the robot from their location. The result is the ability of a remote student to move around the school or similar and interact with classes… not unlike ‘Shelbot’ seen in the Big Bang Theory comedy series! At Fizzics Education we had a Double Robot roaming around our offices for a bit… even my 5 year old daughter was able to control easily although it did freak out my two year old when she moved it towards him
Schools have been using these systems to allow sick kids still attend classes, even for students to present their oral presentations to their class whilst on an excursion. The technology also be used as a way of giving visitors a virtual tour of your site before they even step foot on your grounds – as a former boarding school student I reckon this also presents an interesting possibility for families looking to get an idea of where they are sending their kids! Regardless of how you look at it, these robots and other similar products add yet another dimension to an already exciting field for distance education!